
The instructions below mirror the steps in the Northbeam onboarding flow after you create an account.
Table of Contents
Step 3: Add the Pixel (Shopify Only)
Step 8: Adding Account Managers
Step 9: Additional Setup Items
Overview
Setting up Northbeam with a Shopify store is incredibly simple and straightforward. Our platform has been specifically designed to seamlessly integrate with Shopify, ensuring a smooth and hassle-free experience for our users.
Before starting, there are a couple things to keep in mind.
Website Domain(s)
If you have multiple storefronts on different domains (subdomains or top-level) – for international stores, for example – and you’d like to onboard with all, it may make sense to create separate Northbeam dashboards for each store.
✏️ NOTE: This highly depends on the checkout flows of each store (shared or separate) and preferred reporting segmentation.
For any guidance please contact our Customer Success team
Checkout Flow(s)
Our integration with Shopify goes beyond just capturing events from the standard checkout flow. We also ensure seamless event tracking from Shopify's Recharge checkout flow. This means that regardless of whether your customers are going through the standard Shopify checkout or utilizing the Recharge checkout for subscription-based purchases, Northbeam will accurately capture and track the relevant events.
If you use any other checkout flows or sales channels (ex. ClickFunnels), please contact our Customer Success team – as we need to determine if it’s trackable by our system and if so, the appropriate scripts to use.
✏️ NOTE: Payment gateways such as PayPal and ShopPay are not considered checkout flows in themselves, but rather additional payment options available within the checkout process. We should be able to track these just fine.
If we discover any additional setup needed along the way, we can always schedule a call to evaluate.
Setup Requirements
To begin, sign up for an account at dashboard.northbeam.io.
This will create a Northbeam dashboard. Only one user needs to sign up for an account. If you need to add additional users or teammates, you’ll be able to once you’re in the onboarding flow.
Here's what you'll need:
- Payment information (credit card)
- Login credentials for connected platforms (i.e. Facebook, Klaviyo, TikTok, etc.)
- Access to your domain provider (i.e. GoDaddy, Google Domains, BlueHost, Squarespace, etc.)
- For Shopify: Admin access to Shopify site including head tags and other scripts
If you don’t have access to any of these items, you can always add teammate(s) to your account who do.
Step 1: Enter Website Domain
Please enter your website’s top-level domain. It will look something like northbeam.io, google.com, or bbc.co.uk.
If you have multiple storefronts with different domains – top-level domain or subdomain (ex. mystore.com, us.mystore.com, mystore.co.uk) – please contact our Customer Success team for guidance on the best path forward.
The setup here is highly dependent on whether each store has its own checkout flow and/or own order table. Once our team fully understands your setup, we’ll advise on the best path forward.
Step 2: Basic Details
Enter your basic company details
This information will be displayed in your dashboard and is required in order to activate your dashboard.
This is Northbeam’s repository of information that contains articles, documentation, tutorials, FAQs, and other resources that help users learn about and effectively use the Northbeam dashboard.
Step 3: Add the Pixel (Shopify Only)
- Connect the Platform
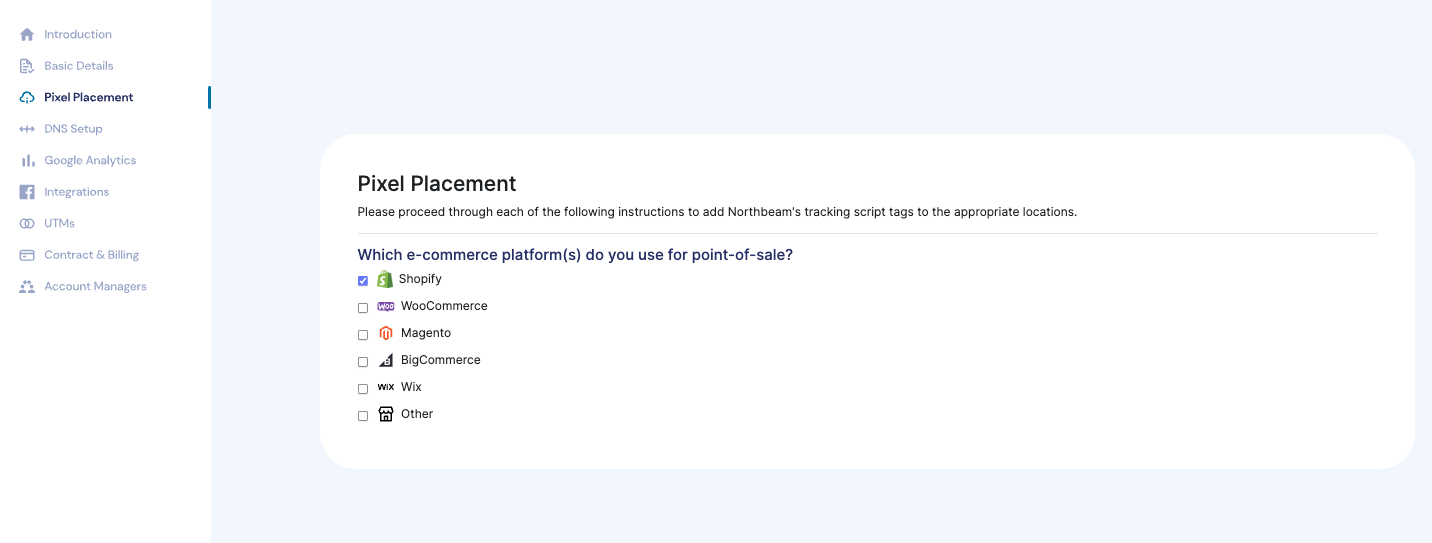
Shopify’s connection process is the most simple – as we have a native integration with their API. Once Shopify is selected, it should prompt you to log into your account and download the Northbeam App from Shopify’s App Store. (link to Northbeam app: https://apps.shopify.com/north-beam)
Please ensure you download the app in the correct Shopify account – this is particularly important if you have multiple Shopify accounts.
Add the Scripts for Northbeam Pixel
This is our base pixel. This allows our system to track all user traffic sources, site behavior and user journeys.
You’ll see two primary methods of installation:
- Hard-coded in Shopify’s theme.liquid file
- Deployed through Google Tag Manager
💡TIP: Ensure that the pixel is added to any subdomains as well.
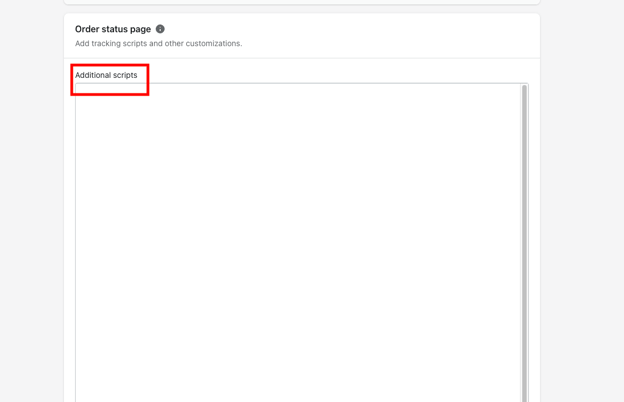
Add the Scripts for Order Status Page
This is our ‘firePurchase’ script for Shopify. This allows our system to recognize and track all of your purchase actions at the time of customer purchase on your website.
You’ll see this is placed in your Shopify Checkout Settings and is set to fire on your ‘Order Status’, or ‘Confirmation’ page of checkout.
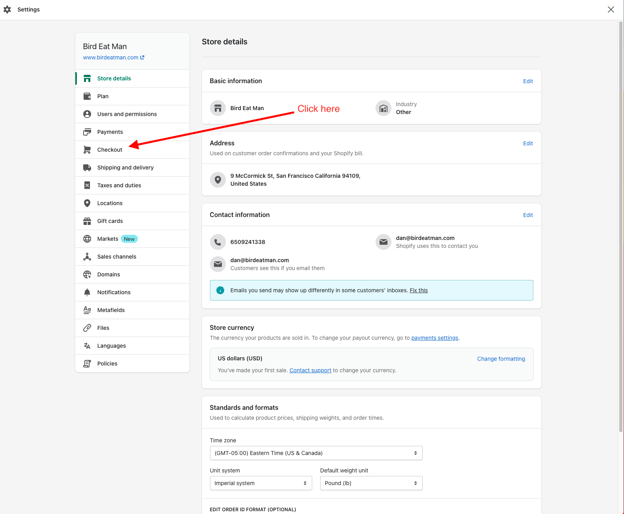
To add the script to the order status page:
- Click the button above to copy this script code to your clipboard.
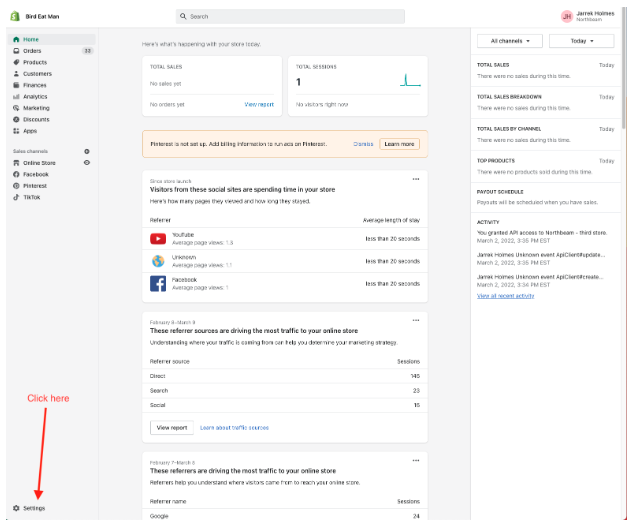
- Go to your Shopify admin panel.
- Click on Settings in the bottom left hand corner
Add Script to Post-Purchase Upsell Page
If your brand utilizes a post-purchase upsell, which is separate from Shopify’s standard checkout flow. Then add the ‘Order Status Page’ script. This should allow our system to capture all post-purchase orders and revenue.
Add Script to Legacy Recharge
If your brand utilizes the legacy version of Recharge, then flows usually happen outside of the standard checkout. Then add the ‘Order Status Page’ script to capture these orders. This should allow our system to capture all Recharge orders and revenue.
✏️ NOTE: If your Recharge checkout page URL begins with ‘checkout.’, this usually indicates you’re using the legacy version.
Step 4: Setup the DNS
Setting up a DNS entry improves our ability to track your customers when they return to your website after their first visit.
In your domain provider, create an A Record, named ‘i’, pointing to a specific address you’ll find in your dashboard. This allows first party tracking.
If the subdomain ‘i’ is already mapped to something, please get in touch with us so we can help you pick a different subdomain name.
There are instructions provided in the onboarding flow for multiple Domain providers:
- Generic
- GoDaddy
- CloudFlare
- Google Domains
Generic solution
- In your DNS, add an A record that points the subdomain i to xx.xx.xxxx.xx
- In the below example Host would be i and Points to would be xx.xx.xxxx.xx
- If the subdomain i is already mapped to something, please get in touch with us so we can help you pick a different subdomain name.

Step 5: Set up Integrations
Setting up each integration is necessary to properly track each platform's data
Platforms listed in the onboarding flow are API integrated with Northbeam. Data included with the API integration includes:
- Spend and Impressions
- Campaign, Ad Set and Ad names
Connect your ad accounts via login credentials. Whoever makes the connection needs to have admin access.
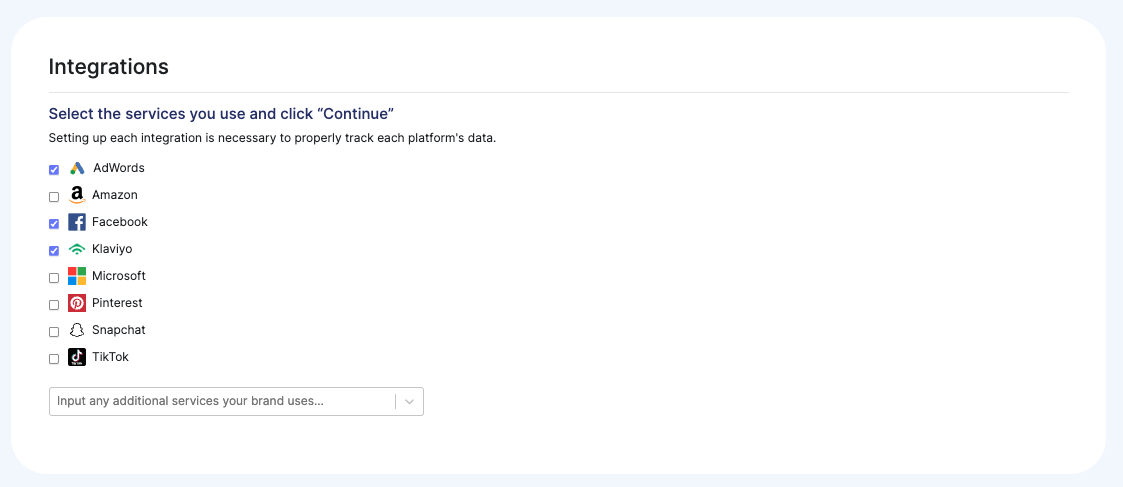
✏️ NOTE: If you wish to connect multiple accounts (ex. 2 Meta, 3 Google, etc), please contact our Customer Success Team with the additional account ID's and we will make the update in our backend.
✏️ NOTE: If you wish to connect multiple Google accounts, be sure all accounts are housed under the same MCC.
Step 6: Append UTMs
Within our UTM guide, you’ll see that we have Northbeam-specific UTM parameters for most major ad platforms (ex. Facebook, Google, TikTok, Snapchat, etc.). If you’re on any of these platforms, please use our UTMs.
Keep in mind, UTMs are a crucial part of the onboarding process. Understandably, some brands prefer to prolong the UTM embedding process to prevent their ads going back into the ‘learning phase’. This is fine, although not ideal – as the absence of UTMs could result in fragmented data, making it challenging to find insights.
If you’re on any platform that isn’t listed on our UTM Guide, use Google’s standard UTMs (ex. source, medium, campaign, term, content) and we’ll pull in the data using this segmentation.
For the most granularity, use utm_campaign, utm_term, and/or utm_content.
- utm_campaign will pull into the campaign level
- utm_ term will pull into adset level
- utm_content will pull into the ad level
💡TIP: Reference our UTM builder to help generate links with UTMs.
The goal here is to ensure that folks land on your site with UTM parameters attached. This can be difficult with certain channels like influencers, podcasts, or direct mail. However, we’ve seen vanity links work well.
These are essentially redirects. For example:
- test.com/podcast redirects to test.com?utm_source=podcast
- test.com/influencers redirects to test.com?utm_source=influencers
💡TIP: We’ve noticed that vanity links reduce the friction in terms of embedding the UTMs.
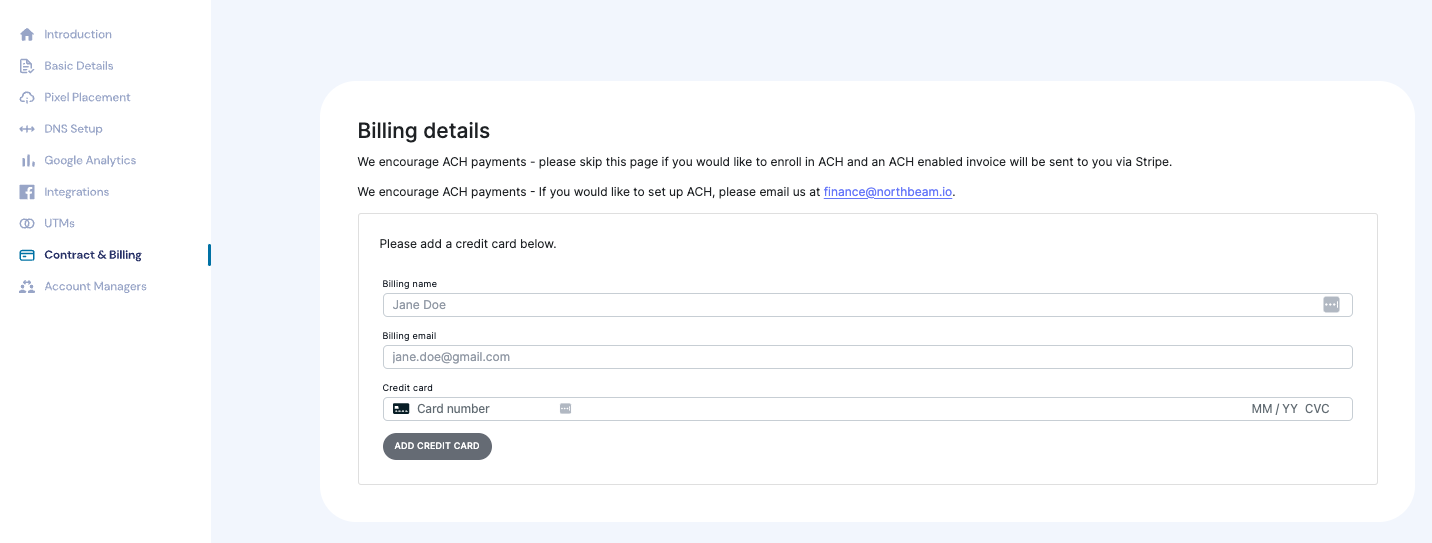
Step 7: Contract & Billing
Enter your billing details here. We encourage ACH payments - please let us know at finance@northbeam.io that you would like to enroll in ACH and an ACH enabled invoice will be sent to you via Stripe.
Step 8: Adding Account Managers
Add additional users to your account.
If you would like to invite a user, please add their email below and click Add Manager.
✏️ NOTE: Northbeam does not put a limit on the number of users in your account. Feel free to add as many people as you would like.
If the user does not receive an email, please check the spam folder. If they still do not receive an email, they can generate a password through the password reset flow on dashboard.northbeam.io.
Next Steps
That’s it! Our team will be monitoring your onboarding progress.
We’ll activate your account once the following are completed:
- Shopify store is connected
- Northbeam Pixel and Order Status Page scripts are placed and tracking properly
- A-Record is created on your DNS record
- UTMs are appended on all live ads
✏️ NOTE: Once activated, we’ll spend the next 3-5 days validating your data. We’ll ensure that your data is flowing in correctly and all connections are properly set up.
In the meantime, you’ll have access to the dashboard. Feel free to tour and prepare any questions for the first review with the team, which normally involves a platform walkthrough.
Please review the next section, which has additional setup items and features that you may be interested in.
Step 9: Additional Setup Items
The items below are not included in the Onboarding flow, but are recommended add ons to your dashboard setup.
Uploading Additional Spend
By default, our API pulls spend (and impressions) from the platforms that we have native integrations with. This includes all of the connected platforms within the ‘Integrations’ step in the onboarding flow, or ‘Connections’ menu when your dashboard is activated.
However, we can use a Custom Spend Sheet to ingest any costs from an alternative platform or source. Common examples include: Klaviyo spend, Attentive spend, Twitter spend, influencer costs, podcast spend, agency fees, etc.
✏️ NOTE: Please contact our Customer Success team for a custom spreadsheet.
Once you receive the sheet, please follow the directions below:
- Reference the 2nd tab called “Input”
- Enter all spend sources in Row 1 (A1, B1, C1, etc).
- Below each source, insert the corresponding costs. Feel free to add them on a daily, weekly, or monthly basis.
- Updated numbers will populate in your next data refresh
✏️ NOTE:
- Feel free to use your own automations to import spend into the “Input” tab (ex. “=importrange” function)
- Please do not edit the tab called “__IMPORT_TARGET__”
💡TIP: You can access + edit the spendsheet in your dashboard, under Settings > Data Spreadsheets.
Once the costs are added, the spend data may be grouped under the platform called "Other". Feel free to make a label to group it into its own category.
Custom Events
By default, our system tracks Purchase events. If you’d like to track other events, please use our fireCustomGoalScript.
✏️ NOTE: If you are using Klaviyo's sign up forms, sign ups are collected through the API Integration
Common use cases are the following:
- Non-Klaviyo Sign Ups
- Add To Cart
- Initiate Checkout
- Quiz Submissions
- Phone Calls
- Leads
- Any other action on your website
Custom Goal Setup Process
Step 1: Make sure the Base Pixel is firing
Please ensure the following:
- The base Northbeam Pixel is firing on the page of where the event occurs
- The page lives on the same top-level domain as your main website
Step 2: Implement our Custom Goal script.
Implement our fireCustomGoalScript to fire after every desired website event. This is our generic Custom Goal script. It strictly tracks the event count.
By default, you’ll see the ‘Goal ID’ (in green) is labeled as “add_to_cart”, but feel free to rename based on the goal. For example, “sms_signup”, “initiate_checkout, etc.
💡TIP: Custom events can be deployed through Google Tag Manager. Please use an HTML tag and be sure to define it as Javascript.[Example]
![[Example]](https://madshot.net/046174450b96.png)
Step 3: Send Northbeam Your Goal ID
Please contact our Customer Success team and let us know what ‘Goal ID’ you’re using (from Step 2). We’ll plug this into our backend, which will enable them in your dashboard view.
Step 4: Add Events into a Saved View
After the events are plugged in, you should see them populate within the Sales menu, under the customize metrics button. Don’t forget to add these metrics to a saved view for easy access.
✏️ NOTE: Once we upload the spend sheet to your account, you can always access + edit it in the platform by going to Settings > Data Spreadsheets
Adding Order Tags
There are specific order types that our system doesn't track. This includes any orders that are not completed through your standard online checkout flow where our tracking pixel doesn’t fire.
Common Examples:
- Recurring Subscription Orders that started prior to implementing Northbeam
- Draft orders
- Wholesale orders
- Facebook or Instagram Shop orders (orders placed via the Meta native checkout experience)
- Mobile Shop app orders (ex. Tapcart)
- Orders from a different sales channel that are pushed to your order table (POS, Internal orders, etc.)
We ask please to append Order Tags to these orders. This way, we can categorize them as ‘untrackable’ within our backend and ignore them during our Data Validation process.
Data integrity is a very important part of using Northbeam and Order Tags help our team Q/A your data.